Chapter 13 / 28
Dynamic Secrets in Action
HashiCorp Vault For Beginners10 min read
Now that we understand what dynamic secrets are and why they’re game-changing, it’s time to get hands-on.
We’ll configure Vault to dynamically generate MySQL credentials. No manual provisioning, no password sharing. And we’ll watch it happen in real-time using phpMyAdmin.
Let’s dive in.
Step 1: Set Up Your Playground with Docker Compose
We’ll start:
- Vault
- MySQL (with a root password and a test database)
- phpMyAdmin (to visually track user creation)
Create a file named docker-compose.yml:
To speed up the hands-on experience, we've already created the
docker-compose.ymlfiles for you and placed them inside thechapter-13folder. Make sure to go inside the chapter-13 folder before executing the docker compose up -d command.
services:
  vault:
    image: hashicorp/vault:latest
    container_name: vault
    ports:
      - "8200:8200"
    environment:
      VAULT_DEV_LISTEN_ADDRESS: "0.0.0.0:8200"
    volumes:
      - ../vault-data/config:/vault/config
      - ../vault-data/file:/vault/file
      - ../vault-data/logs:/vault/logs
      - ../:/home/vault/vault-beginner
    cap_add:
      - IPC_LOCK
    command: "server"

  mysql:
    image: mysql:8.0
    container_name: mysql
    environment:
      MYSQL_ROOT_PASSWORD: rootpass
      MYSQL_DATABASE: vaultdb
    ports:
      - "3306:3306"

  phpmyadmin:
    image: phpmyadmin/phpmyadmin
    container_name: phpmyadmin
    environment:
      PMA_HOST: mysql
      MYSQL_ROOT_PASSWORD: rootpass
    ports:
      - "8080:80"
Step 2: Stop the old vault-dev container
If the container from the previous chapter is still running, you’ll need to stop it before starting a new one.
Run:
docker stop vault-dev
This ensures there's no port conflict and a clean start for your new setup.
Step 3: Start the Stack
Run:
docker compose up -d
This command will start three containers: HashiCorp Vault, MySQL Database, and phpMyAdmin. Once they're up and running, you can access the Vault UI and phpMyAdmin via the following URLs in your browser:
- Vault UI → http://localhost:8200
- phpMyAdmin → http://localhost:8080
(login asroot/rootpass)
Step 4: Attach to the Vault Container
To interact with Vault CLI inside the container, run below command.
docker exec -it vault-dev /bin/sh
Now you’re inside the Vault container.
Step 5: Export the Vault Address
Before using Vault CLI, we need to tell it where Vault is running.
export VAULT_ADDR=http://localhost:8200
This command sets the Vault server address as an environment variable. The CLI uses this to send all your requests to Vault.
Step 6: Unseal the Vault
Vault is sealed by default for security. To unseal it, you need to provide at least three unseal key shares from the initialization step in Chapter 3.
Run the following command three times, each time providing one unseal key when prompted:
vault operator unseal
Paste a different unseal key each time. After the third key, Vault will be unsealed and ready to use.
Note: Use the unseal keys you saved during initialization. If those keys are lost, you'll need to reinitialize Vault from scratch.
Step 7: Login to Vault
Login as root
vault login <your-root-token>
(Replace <your-root-token> with your actual root token you have received when you performed the vault operator init.)
Step 8: Enable the Database Secrets Engine
Run:
vault secrets enable database
This enables the database/ path, which Vault uses to manage connections and dynamic secrets for databases.
Step 9: Configure the MySQL Plugin
Here’s how we teach Vault to talk to our MySQL database:
vault write database/config/my-mysql-database \
  plugin_name=mysql-database-plugin \
  connection_url="{{username}}:{{password}}@tcp(mysql:3306)/" \
  allowed_roles="readonly-role" \
  username="root" \
  password="rootpass"
Let's break it down:
🔹 my-mysql-database
This is just a logical name for your connection config. You’ll refer to this again later when creating roles (using db_name=my-mysql-database). Think of it like a reference alias.
🔹 plugin_name
This tells Vault which plugin to use. For MySQL, it's always mysql-database-plugin.
🔹 connection_url
Vault uses this format to log into your MySQL server. The placeholders {{username}} and {{password}} will be replaced by the values below — the root user and password.
The mysql:3306 is the container name and port inside Docker.
🔹 allowed_roles
This field whitelists the roles that are allowed to use this database configuration.
Only these roles (like readonly-role) will be permitted to generate credentials for this DB. This is a critical security control.
Step 10: Define the Dynamic Credentials Role
Now, we create a role that defines how Vault should create MySQL users.
vault write database/roles/readonly-role \
  db_name=my-mysql-database \
  creation_statements="CREATE USER '{{name}}'@'%' IDENTIFIED BY '{{password}}'; GRANT SELECT ON vaultdb.* TO '{{name}}'@'%';" \
  default_ttl="1m" \
  max_ttl="5m"
Let’s understand this:
🔹 db_name=my-mysql-database
This links the role to the database config we created earlier (with the name my-mysql-database).
🔹 creation_statements
This is the real magic — it tells Vault how to create a user in SQL.
CREATE USER '{{name}}'@'%' IDENTIFIED BY '{{password}}';
GRANT SELECT ON vaultdb.* TO '{{name}}'@'%';
{{name}}and{{password}}are placeholders that Vault replaces when it generates a user.- This user gets read-only access to everything in the
vaultdbdatabase. - The user is valid from any host (because of
@'%').
🔹 default_ttl and max_ttl
These define how long the user exists:
- Default time-to-live: 1 minute
- Max time-to-live: 5 minutes
Vault will automatically delete the user after the TTL expires unless the lease is renewed.
Step 11: Generate Dynamic Credentials
Now we ask Vault to give us a new MySQL credential:
vault read database/creds/readonly-role
This triggers Vault to:
- Generate a new MySQL user.
- Insert it into MySQL.
- Return the credentials to you.
Example output:
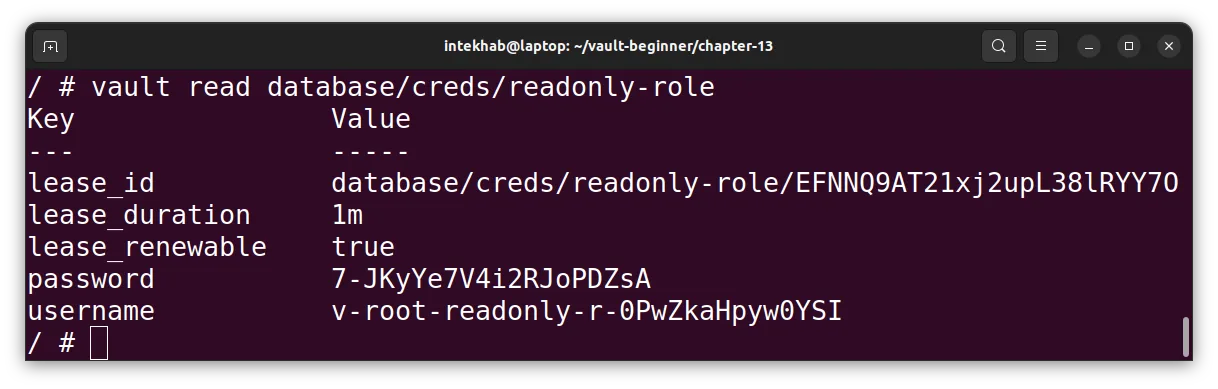
Let’s explain what just happened:
vault read database/creds/readonly-role: This asks Vault to create a dynamic secret for thereadonly-role.- Vault uses the role’s
creation_statementsto make a new user. - That user now exists in MySQL and can only read from
vaultdb.
Open phpMyAdmin, go to the Users tab, and you’ll see the new user created by Vault!
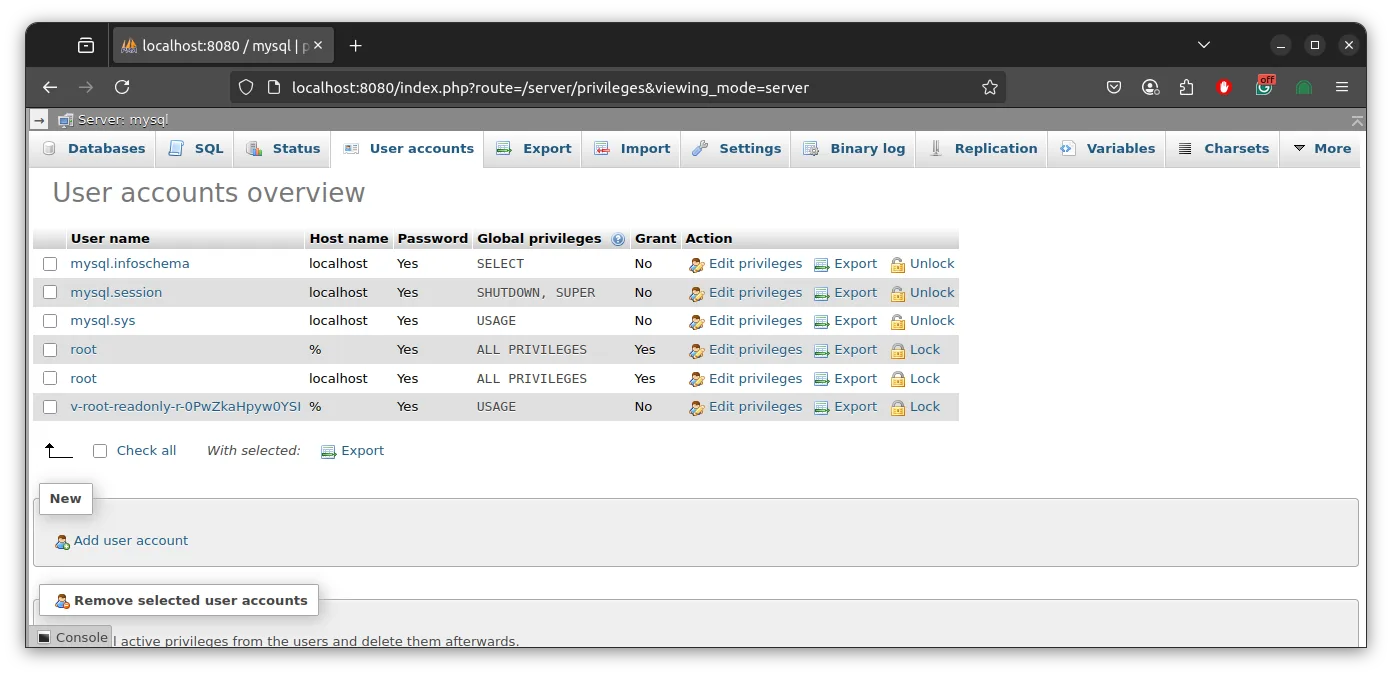
Step 12: Watch TTL Expiry in Real Time
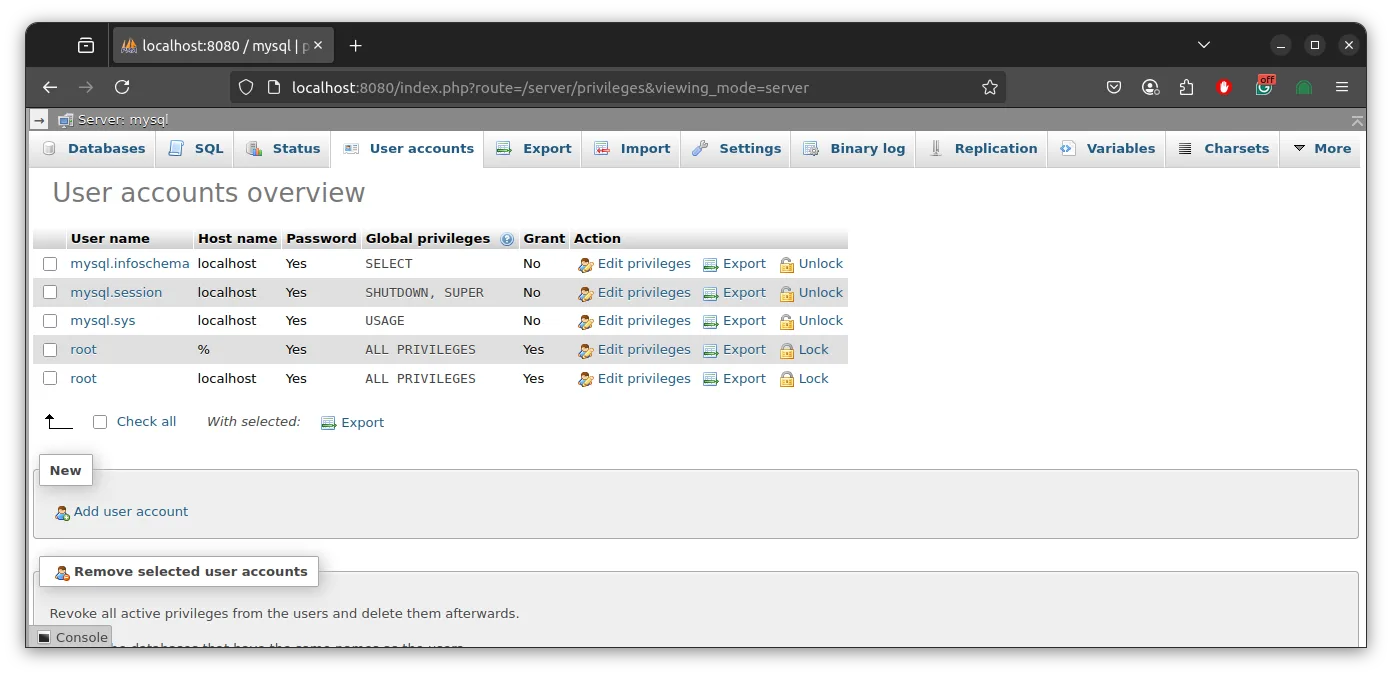
Wait 1 minute and refresh the users list in phpMyAdmin.
Poof. The user is gone.
That’s Vault cleaning up after itself — just like it promised.
You can also revoke manually:
vault lease revoke <lease_id>
Replace <lease_id> with the one you got in the output above.
Recap
What we did:
- Created a local lab with Vault, MySQL, and phpMyAdmin.
- Configured Vault to connect to MySQL using secure root credentials.
- Defined a role that generates dynamic MySQL users.
- Saw those users appear and disappear inside phpMyAdmin — like clockwork.
Next Up
In the next chapter, we’ll:
- Tweak TTLs and permissions for dynamic users.
- Build more complex SQL creation statements.
- Use Vault policies to allow users (like Alice) to request dynamic DB credentials — securely.
We're officially automating secure database access — welcome to the next level.