Chapter 20 / 28
Vault Agent and Templating: Bridging the Gap for Legacy Apps
HashiCorp Vault For Beginners16 min read
Up until now, we've pulled secrets automatically using AppRole, with the application talking directly to Vault. So, you might be wondering—if the credentials are already automated, why do we need Vault Agent at all?
Good question.
Vault Agent becomes essential when you're dealing with legacy applications or third-party tools that can’t talk to Vault directly. These apps often expect credentials to be available in plain files—like config files or environment files—rather than fetching them dynamically via an API.
Vault Agent acts as a middleman. It runs alongside your application, handles authentication (like AppRole under the hood), pulls secrets from Vault, and writes them to disk in a format your app expects. It can even watch for secret rotations and update those files automatically, all without restarting the application.
In short:
Vault Agent brings Vault’s dynamic secrets to apps that never heard of Vault.
In this chapter we will learn
- What is Vault Agent?
- What is the Vault Template?
- Why and when you should use it
- How to configure Vault Agent
- Running Vault Agent with auto-auth and template rendering
- Live example using KV-v2 engine
- Common pitfalls and real-world use cases
What Is Vault Agent?
Vault Agent is a helper tool provided by HashiCorp Vault that does three major things:
- Auto-Authentication
Vault Agent can authenticate to Vault using supported auth methods like AppRole, AWS, Kubernetes, etc., and retrieve a client token. - Token Renewal
It can keep that token alive using periodic renewal, avoiding the need to re-authenticate repeatedly. - Template Rendering
Using Hashicorp Consul Template syntax, Vault Agent can fetch secrets and render them to a file on disk. This is incredibly useful when apps are not Vault-aware but still need secrets.
Vault Agent Configuration Anatomy
Here’s what a basic Vault Agent config file looks like:
exit_after_auth = false
pid_file = "/tmp/vault-agent.pid"

auto_auth {
  method "approle" {
    mount_path = "auth/approle"
    config = {
      role_id_file_path = "/etc/vault/role_id.txt"
      secret_id_file_path = "/etc/vault/secret_id.txt"
    remove_secret_id_file_after_reading = false
    }
  }

  sink "file" {
    config = {
      path = "/etc/vault/token.txt"
    }
  }
}

template {
  source      = "/etc/vault/db-creds.tpl"
  destination = "/etc/secrets/db.env"
}
Let's Break It Down:
exit_after_auth
- If
true, Vault Agent will exit after acquiring a token. - We want a long-running process, so we keep it
false.
pid_file
- Path to a file storing the Agent's process ID.
auto_auth Block
This is where we define how Vault Agent should log in.
method
- Specifies the auth method—in our case, AppRole.
- The
mount_pathmust match where you enabled AppRole in Vault.
role_id_file_path & secret_id_file_path
- These files must contain the Role ID and Secret ID. These are provided at deployment time (e.g., by CI/CD).
sink Block
This tells Vault Agent where to store the generated client token.
sink "file" {
  config = {
    path = "/etc/vault/token.txt"
  }
}
The app (or Vault Agent itself) can use this token to interact with Vault for other operations.
template Block
This is where Vault Agent shines.
You specify:
source: A template file containing the Vault secrets syntax.destination: Where to write the rendered file.
Example template (db-creds.tpl):
DB_USER={{ with secret "myapp/webapp/dbcreds" }}{{ .Data.data.username }}{{ end }}
DB_PASS={{ with secret "myapp/webapp/dbcreds" }}{{ .Data.data.password }}{{ end }}
Once Vault Agent runs, it fetches the secrets and writes them as:
DB_USER=app_user
DB_PASS=SuperSecret123
Lab Setup: Let’s Make It Real
Step 1: Start Vault Container
We'll reuse the kv-v2 secrets engine from myapp path and AppRole setup from the previous chapter. Let’s begin by starting the standalone Vault container using the command below: Make sure you are at the top folder of the cloned repo.
docker run -d --rm \
  -p 8200:8200 \
  -v $(pwd)/vault-data/config:/vault/config \
  -v $(pwd)/vault-data/file:/vault/file \
  -v $(pwd)/vault-data/logs:/vault/logs \
  -v $(pwd):/home/vault/vault-beginner \
  --cap-add=IPC_LOCK \
  --name vault-dev \
    hashicorp/vault:latest server
Step 2: Attach to the Vault Container
Execute the following command to connect to the running Vault container:
docker exec -it vault-dev /bin/sh
Once you're inside the container, set the Vault address by exporting it as an environment variable. This ensures the Vault CLI knows where to send requests.
export VAULT_ADDR='http://127.0.0.1:8200'
Step 3: Unseal the Vault
Vault is sealed by default for security. To unseal it, you need to provide at least three unseal key shares from the initialization step in Chapter 3.
Run the following command three times, each time providing one unseal key when prompted:
vault operator unseal
Paste a different unseal key each time. After the third key, Vault will be unsealed and ready to use.
Step 4: Login to Vault
Login as root
vault login <your-root-token>
(Replace <your-root-token> with your actual root token you have received when you performed the vault operator init.)
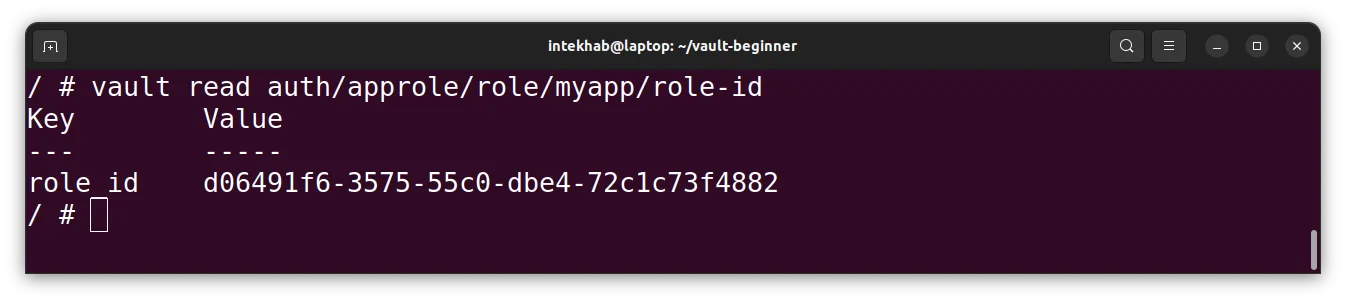
Setp 5: Get Role ID
Now let’s fetch the Role ID by running the following command.
Once you have it, paste just the Role ID into the file located at chapter-20/role_id.txt
vault read auth/approle/role/myapp/role-id
the output will be like below
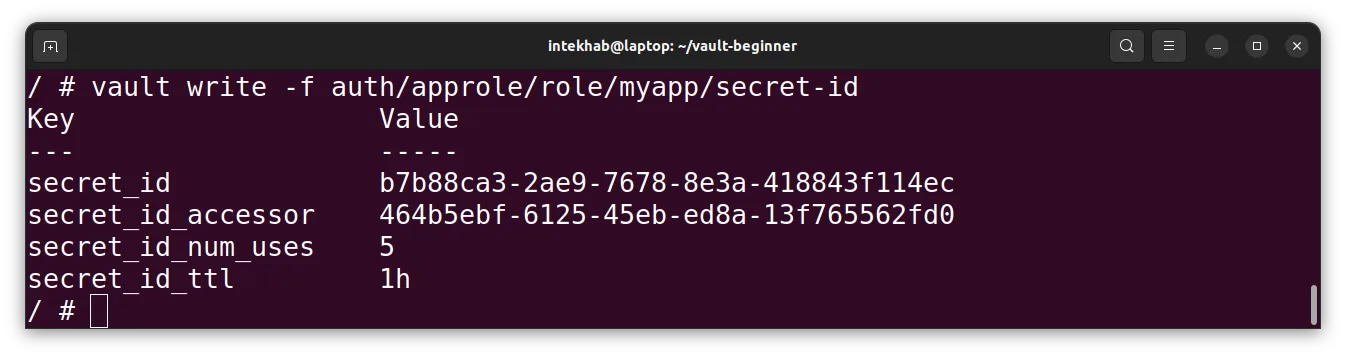
Now let’s generate the Secret ID by running the following command.
Once you receive it, copy just the Secret ID and save it inside chapter-20/secret_id.txt file.
vault write -f auth/approle/role/myapp/secret-id
You’ll also notice a file named `db.env` and `token.txt` inside the `chapter-20` directory. These files should be empty initially. Once the Vault Agent starts, it will automatically populate these files with the token and credentials autometically from Vault server. Go ahead and open it now to confirm that it’s currently empty.
Step 8: Create Credential Template and Agent Config File
First, let’s create the credentials template file with below code snippet and store it inside chapter-20/db-creds.tpl
DB_USER={{ with secret "myapp/webapp/dbcreds" }}{{ .Data.data.username }}{{ end }}
DB_PASS={{ with secret "myapp/webapp/dbcreds" }}{{ .Data.data.password }}{{ end }}
For the vault agent config file, use below config and save it at chapter-20/vault-agent.hcl location.
exit_after_auth = false
pid_file = "/tmp/vault-agent.pid"

auto_auth {
  method "approle" {
    mount_path = "auth/approle"
    config = {
      role_id_file_path = "/home/vault/vault-beginner/chapter-20/role_id.txt"
      secret_id_file_path = "/home/vault/vault-beginner/chapter-20/secret_id.txt"
    remove_secret_id_file_after_reading = false
    }
  }

  sink "file" {
    config = {
      path = "/home/vault/vault-beginner/chapter-20/token.txt"
    }
  }
}

template {
  source      = "/home/vault/vault-beginner/chapter-20/db-creds.tpl"
  destination = "/home/vault/vault-beginner/chapter-20/db.env"
}
To speed up the hands-on experience, we've already created those files for you and placed them inside the
chapter-20folder.
Step 9: Stop vault standalone container
Now that all the configuration is in place, you’ll need the Vault Agent binary to get things going. But don’t worry—you don’t have to install anything manually. We’ve already prepped everything for you in a Docker-friendly way.
Instead of running Vault Agent directly, we’ll start it inside a container. And to make sure it can talk to the Vault server, we’ll bring both up using Docker Compose—this way, they’re on the same network, and communication between them just works.
So first, stop the standalone Vault server container using the below command.
docker stop vault-dev
Step 9: Start vault stack
Let’s start the full stack (Vault Server + Vault Agent) but first go inside the chapter-20 directory and issue the below command.
docker compose up
This will start the two containers, one for vault server and other for the vault agent.
When you run this command, Docker starts in attached mode—meaning all logs from the services will stream directly to your terminal. Because of that, you won't get your shell prompt back right away.
Let it run as is for couple of seconds.
After a few seconds, you’ll likely see an error saying that Vault is sealed. That’s completely normal.
Now, open another terminal window and attach to the Vault container to unseal it.
Step 10: Attach to the Vault Container
docker exec -it vault-dev /bin/sh
Inside the container, set the Vault address in env variable:
export VAULT_ADDR='http://127.0.0.1:8200'
Step 11: Unseal the Vault
Vault is sealed by default for security. To unseal it, you need to provide at least three unseal key shares from the initialization step in Chapter 3.
Run the following command three times, each time providing one unseal key when prompted:
vault operator unseal
Paste a different unseal key each time. After the third key, Vault will be unsealed and ready to use.
Step 12: Verify the db.env file
Once Vault is unsealed, the Vault Agent (running in the first tab) will automatically authenticate using the Role ID and Secret ID, fetch the secrets, and write them to the db.env file.
You’ll also see a log confirmation in the first tab—something like below. Pay attention to the very last line in the screenshot.
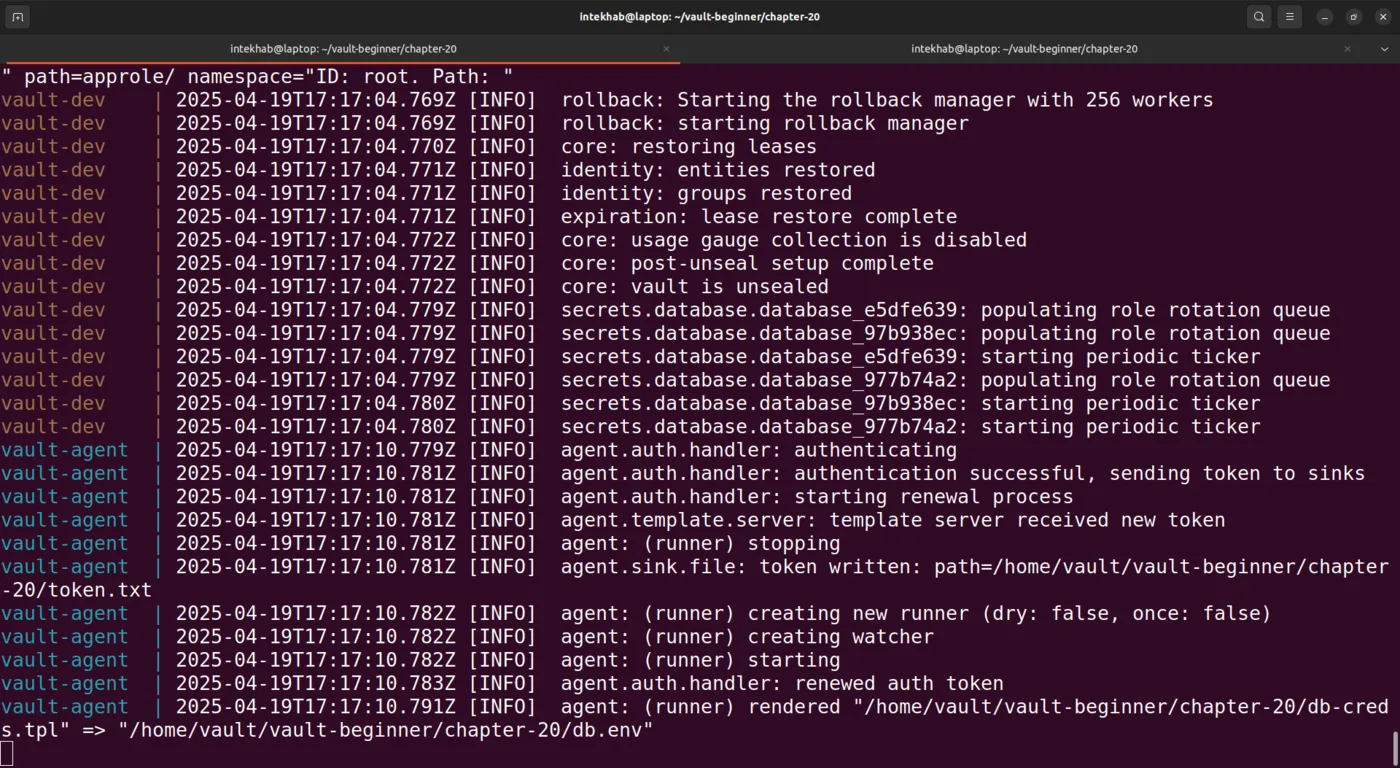
That means everything worked! Secrets delivered, no hands required.
Final Result
Your secrets now live inside a db.env like:
DB_USER=app_user

DB_PASS=SuperSecret123
And your application can source this file without ever knowing Vault exists.
Step 16: Shutdown lab
Once you're done with your practice, it's time to shut down our lab setup (Vault server and vault agent). To stop and clean up the running containers, simply press CTRL + C on the first terminal and after that run below command.
docker compose down
This will gracefully stop both services and remove the associated containers and network. Don’t worry, your Vault data remains safe! It’s stored in persistent storage, so it won’t be lost.
Real-World Use Cases
- Containerized apps without native Vault integration
- Traditional apps expecting
.envfiles - High-security systems with no outbound internet
Summary:
In this chapter, you leveled up your Vault automation game.
We explored how Vault Agent can remove the manual burden of fetching secrets by automatically authenticating with Vault using AppRole, retrieving secrets, and writing them to a local file in a format your application can use.
You configured:
- A template to render secrets from Vault into an environment file (
db.env) - A Vault Agent config that handles authentication and token management
- A Docker Compose setup that runs both Vault and Vault Agent in an isolated network
Once everything was in place, you saw how Vault Agent:
- Automatically logs in using Role ID and Secret ID
- Retrieves secrets from Vault
- Populates the
db.envfile without restarting or manual intervention
This chapter shows the real power of automation—perfect for legacy apps that can't speak to Vault directly, and a great way to keep secrets in sync without writing a line of glue code.